This section allows you to define where the SalesPro app can find information about Appointments. For CRM users, the initial set up for adding your CRM will pull your appointments over to SalesPro. There are currently six options to choose from: For a comprehensive guide on setting up your CRM see CRM Integrations.
MarketSharp
- In your SalesPro Dashboard, navigate to App Settings > Appointments.
- Select MarketSharp as the Source.
- Click Save.

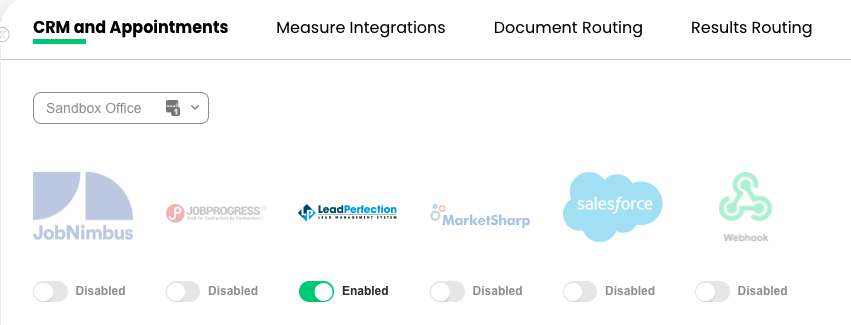
LeadPerfection
- In your SalesPro Dashboard, navigate to Workflow > CRM and Appointments.
- Toggle the LeadPerfection toggle to “on”.
- Click Save.
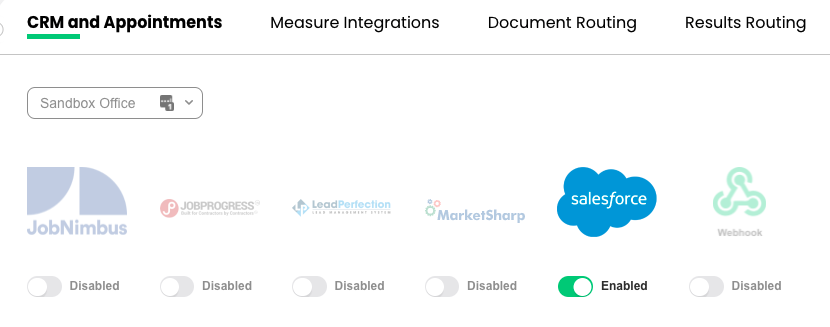
Salesforce
- In your SalesPro Dashboard, navigate to Workflow > CRM and Appointments.
- Toggle the Salesforce toggle to “on”.
- Click Save.
You must also define the information SalesPro should pull out of Salesforce and then map that information to fields inside of SalesPro. For ImproveIt 360, click the Setup for improveit360 button. This will setup your account with the necessary data needed to pull appointments from i360 automatically. No further setup will be required for this section unless you want to customize the data further. See below. To define the information to be pulled from Salesforce, you must create a SOQL query string and paste it into the Query field. Contact your Salesforce administrator for help on how to create this query string. Once you have defined a Query string, you must then map the information the query retrieves to fields inside of SalesPro. You can map each field in your query string by clicking the Add button and defining a value for the following:
App Title
The title that will appear to the user inside the SalesPro app.
Salesforce API Name
The API name of the data returned from Salesforce (i.e. i360__Prospect_Primary__c or i360__Comments__c).
Salesforce Data Type
The type of information that will be returned from Salesforce, such as:
- Text | Picklist – Plain Text or Picker List.
- Number – A numerical value that is not plain text.
- Appointment Date/Time – The date and time of the appointment.
- Date – A date value.
- Phone – A string of data in phone-number format.
Date Format
When Date is selected as the Type, you must specify a date format. Note: Salesforce Date fields are “yyyy-MM-dd” and Date/Time fields are “yyyy-MM-dd’T’HH:mm:ss.SSSZ”.
Map To
The field inside of SalesPro to which the information from a query should be mapped. Options include:
- Email – Tells SalesPro to map the value to an email address.
- Phone – Tells SalesPro to map the value to a phone number.
- Name – Tells SalesPro that this is the name of the person associated with a given appointment and populates the first and last name fields.
- Full Address – Tells SalesPro that this is the Street, City, State, and Zip of an address. SalesPro will try to parse this value and populate the information it has to the correct fields.
- Street – Tells SalesPro to map the value to the street address.
- Appointment Notes – Tells SalesPro to map information collected during an appointment to the appointment notes fields.
- Search Button – This field allows users to search previous estimates created for the same customer of a given appointment. The Title will be the title of the Search button inside of the SalesPro app. You should leave Salesforce Key blank when using this App Key.
- Salesforce ID – This field must always be added if you want attachments and notes to be added to Salesforce. You should leave Title blank and Display turned OFF when using this option.
JobNimbus
- In your SalesPro Dashboard, navigate to Workflow > CRM and Appointments.
- Toggle the JobNimbus toggle to “on”.
- Click Save.
- Select the Appointment Type(s) SalesPro should fetch the appointments from. Typically these include Appointment, Task, Phone Call and Meeting.

Calendar
Follow these steps to import your Calendar to the SalesPro app:
- In the App, tap the Settings menu.
- Tap Import Calendars.

Webhook
See API documentation.