Resulting an estimate is one of the most important components of SalesPro. The Results Report contains all of the information added to the estimate which includes details about the added measure sheet items, selected price guide option, and upcharges. The report also includes any Results information that you set up in Results Settings such as Total Estimate Price, Total Sale Amount, Commission Estimate, Payment Method, etc.
Results Settings
- In your SalesPro Dashboard, navigate to Workflow on the menu.
- Click Results Routing.
- Choose what methods you want to send your report using the toggle switches
- Set up Results Fields for both Sale and No-Sale.
- Click Save to save your changes.
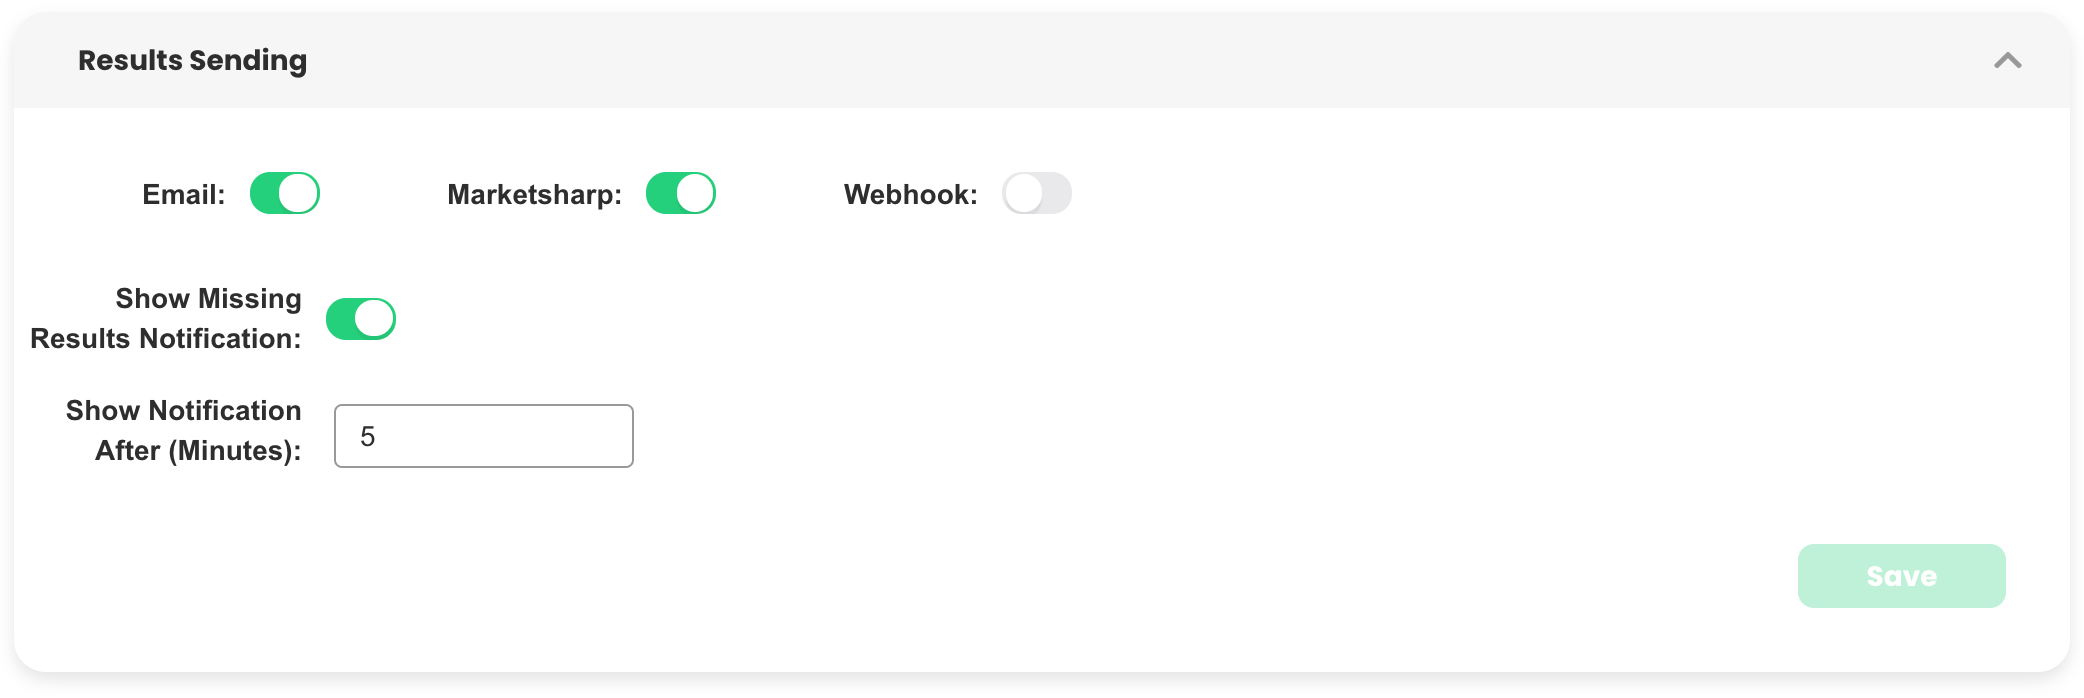
- Routing Toggles: Use these toggle switches to tell SalesPro where it should send the contract. There are three options to choose from: Email, Your CRM and Webhook.
- Show Missing Results Notification: Notifies the user that the appointment was not resulted after a specified period of time. The period of time can be adjusted by adjusting the Show Notification After (Minutes).
- Show Notification After (Minutes): Shows a notification after a certain number of minutes from the start of the appointment. The timer starts once the customer’s name has been selected. 90 minutes is recommended as a default and can be adjusted later.
Results Routing by API
Use this section to define the default sending settings when emailing results reports. For this section to appear, first select the Email Toggle option from the Results Settings section. You can populate any field with a Placeholder that pulls specific information such as Customer Name and Customer Email.
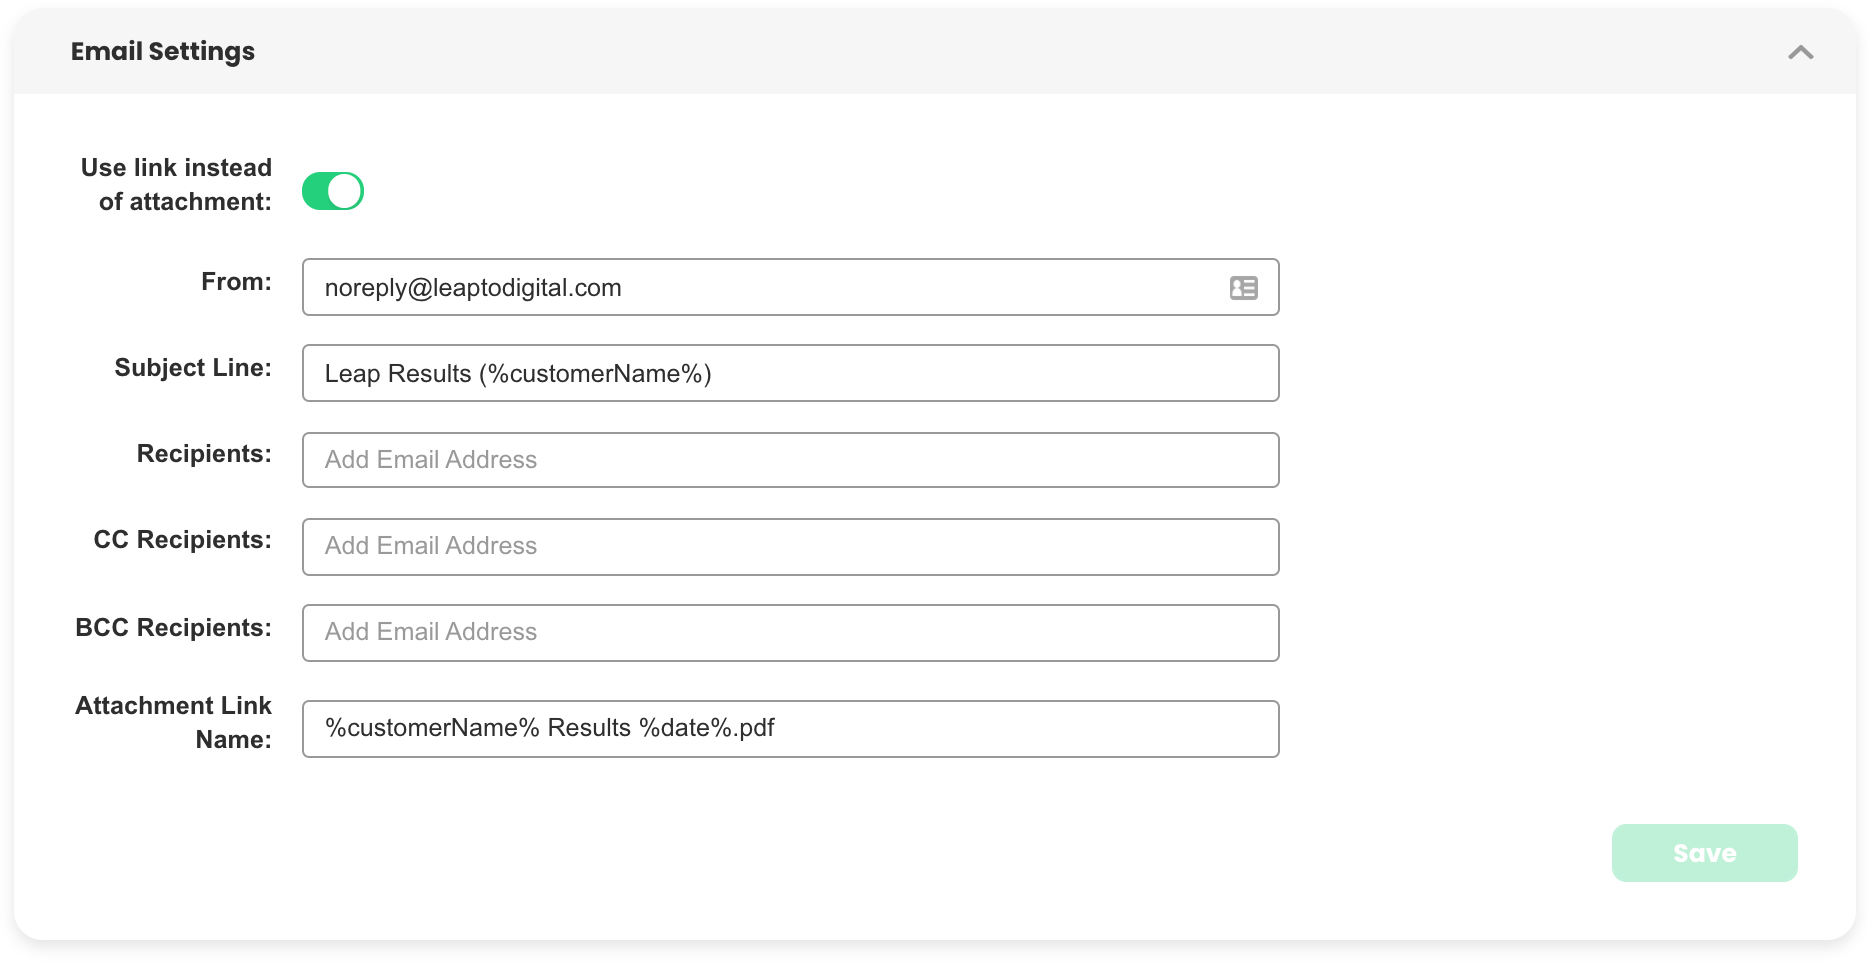
- From: The address from which you want all Results to be emailed.
- Subject Line: The subject line that appears in Results emails.
- Recipients: Email addresses to which you want all Results sent.
- CC Recipients: Email addresses to which you want all Results carbon copied.
- BCC Recipients: Email addresses to which you want all Results blind carbon copied.
- Attachment File Name: The name of the PDF attachment sent with the email. Note: Attachment File Name must end with ‘.pdf’
Leap
Use this section to define the default sending settings when uploading results reports to Leap. For this section to appear, first select the Leap (JobProgress) API option from the Results Settings section. You can populate any field with a Placeholder which pulls specific information such a Customer Name and Customer Email. All PDF attachments uploaded to Leap can be found under the the designated File Destination location tab of a given Job record.
MarketSharp
Use this section to define the default sending settings when uploading results reports to MarketSharp. For this section to appear, first select the MarketSharp API option from the Results Settings section. You can populate any field with a Placeholder which pulls specific information such a Customer Name and Customer Email. All PDF attachments uploaded to MarketSharp can be found under the Attachments tab of a given customer record.
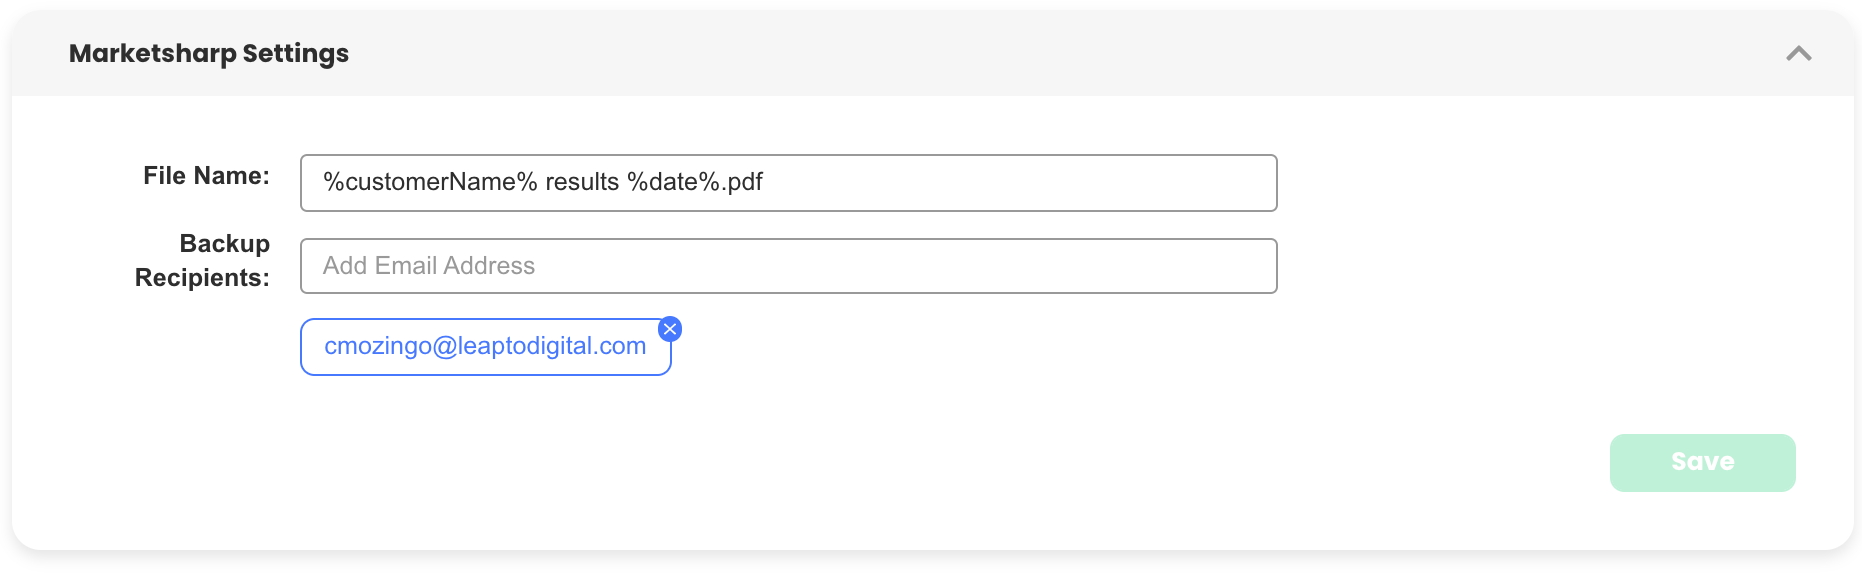
- File Name: The name of the attachment that will get saved to MarketSharp. Note: File Name must end with ‘.pdf’
- Backup Recipients: In the event a document fails to upload to MarketSharp, the app will send an email to all email addresses listed in Backup Recipients. This email will include the attachment that failed to upload to MarketSharp, as well as the customer information and a brief description of why it failed to upload.
LeadPerfection
Use this section to define the default sending settings when uploading results reports to LeadPerfection. For this section to appear, first select the LeadPerfection API option from the Results Settings section. You can populate any field with a Placeholder which pulls specific information such a Customer Name and Customer Email. All PDF attachments uploaded to LeadPerfection can be found under the Docs tab of a given record.
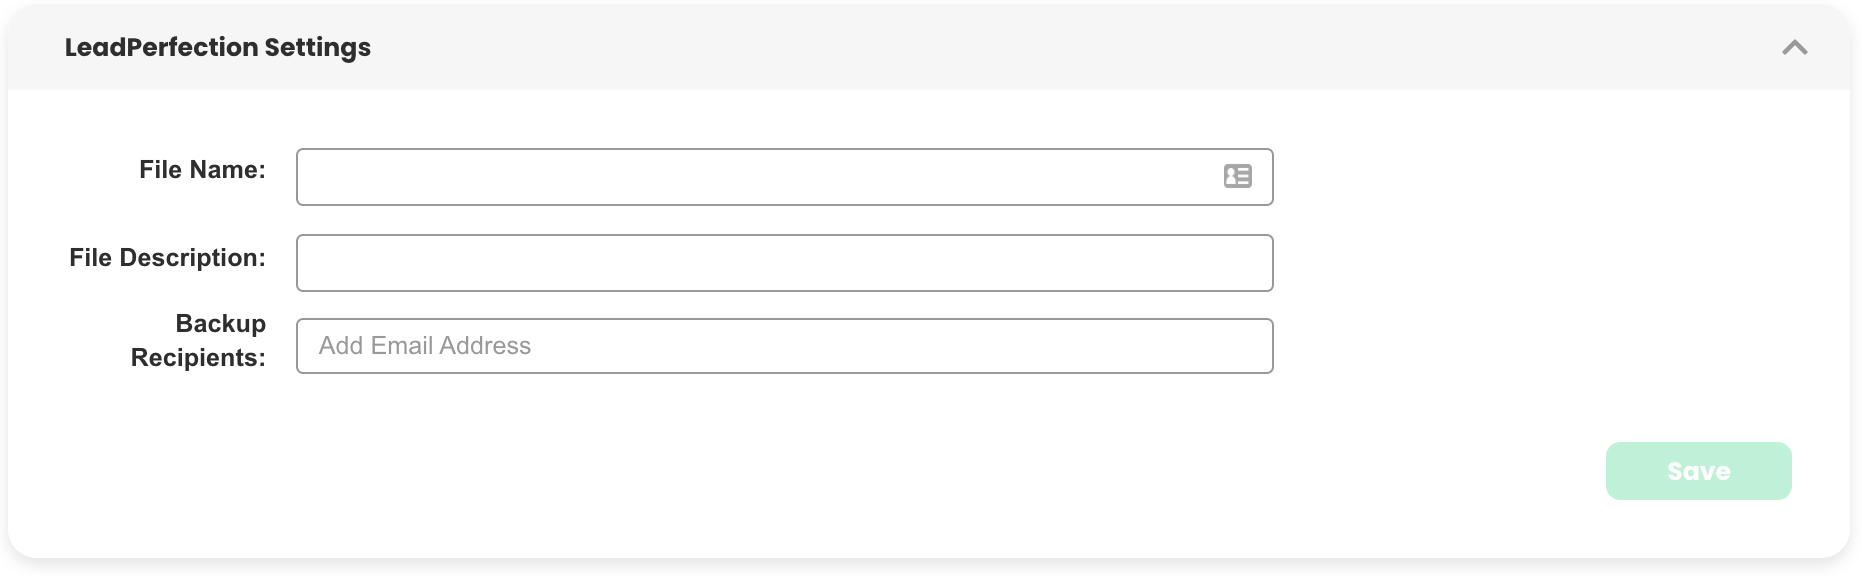
- File Name: The file name of the attachment that will get uploaded to LeadPerfection. Note: File Name must end with ‘.pdf’
- File Description: A description of the attachment uploaded to LeadPerfection.
- Backup Recipients:
In the event a document fails to upload to LeadPerfection, the app will send an email to all email addresses listed in Backup Recipients. This email will include the attachment that failed to upload to LeadPerfection, as well as the customer information and a brief description of why it failed to upload.
JobNimbus
Use this section to define the default sending settings when uploading results reports to JobNimbus. For this section to appear, first select the JobNimbus API option from the Results Settings section. You can populate any field with a Placeholder which pulls specific information such a Customer Name and Customer Email. All PDF attachments uploaded to JobNimbus can be found under the Docs tab of a given record.
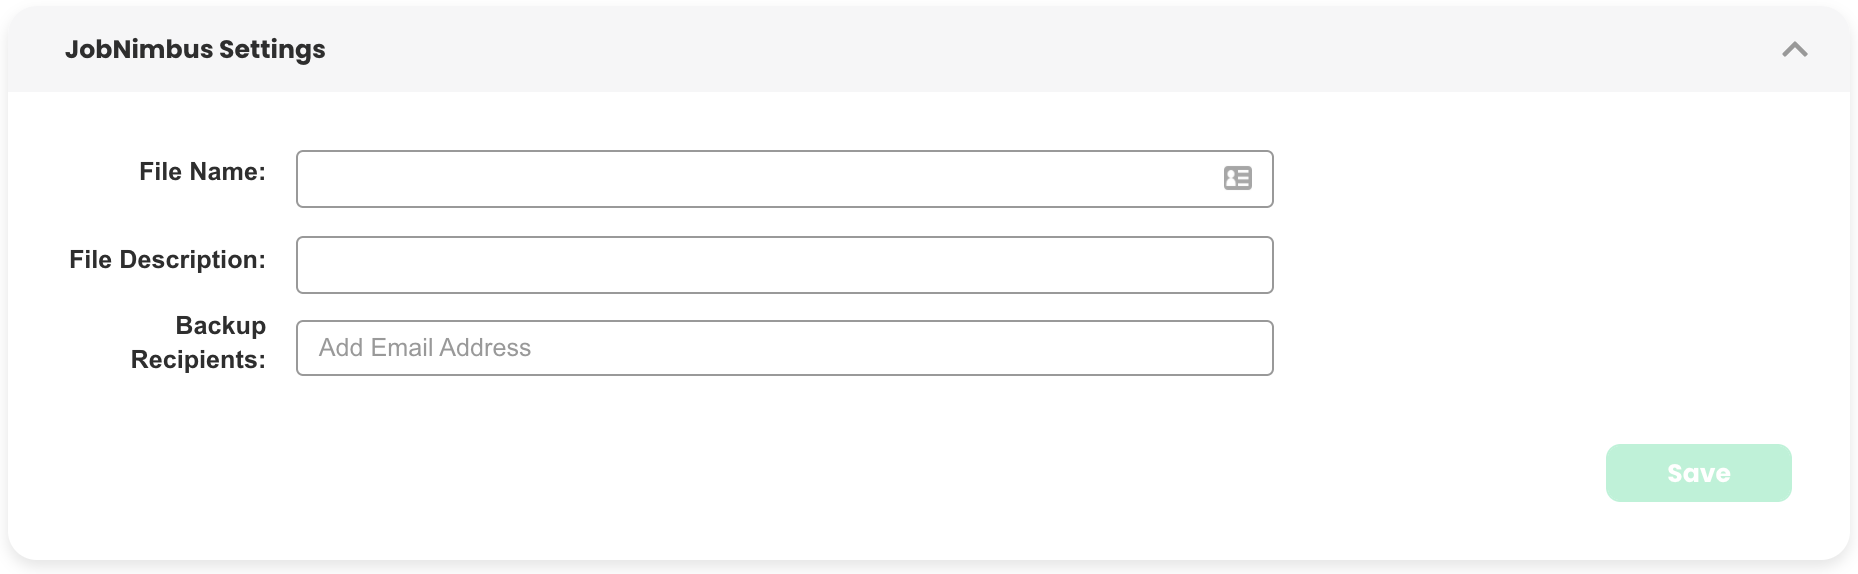
- File Name: The file name of the attachment that will get uploaded to JobNimbus. Note: File Name must end with ‘.pdf’
- File Description: A description of the attachment uploaded to JobNimbus.
- Backup Recipients: In the event a document fails to upload to JobNimbus, the app will send an email to all email addresses listed in Backup Recipients. This email will include the attachment that failed to upload to JobNimbus, as well as the customer information and a brief description of why it failed to upload.
Salesforce or improveit 360
Use this section to define the default sending settings when uploading results reports to Salesforce/i360. For this section to appear, first select the Salesforce API option from the Results Settings section. You can populate any field with a Placeholder which pulls specific information such a Customer Name and Customer Email. All PDF attachments uploaded to Salesforce or Improveit 360 can be found under the Notes & Attachments tab of a given record.
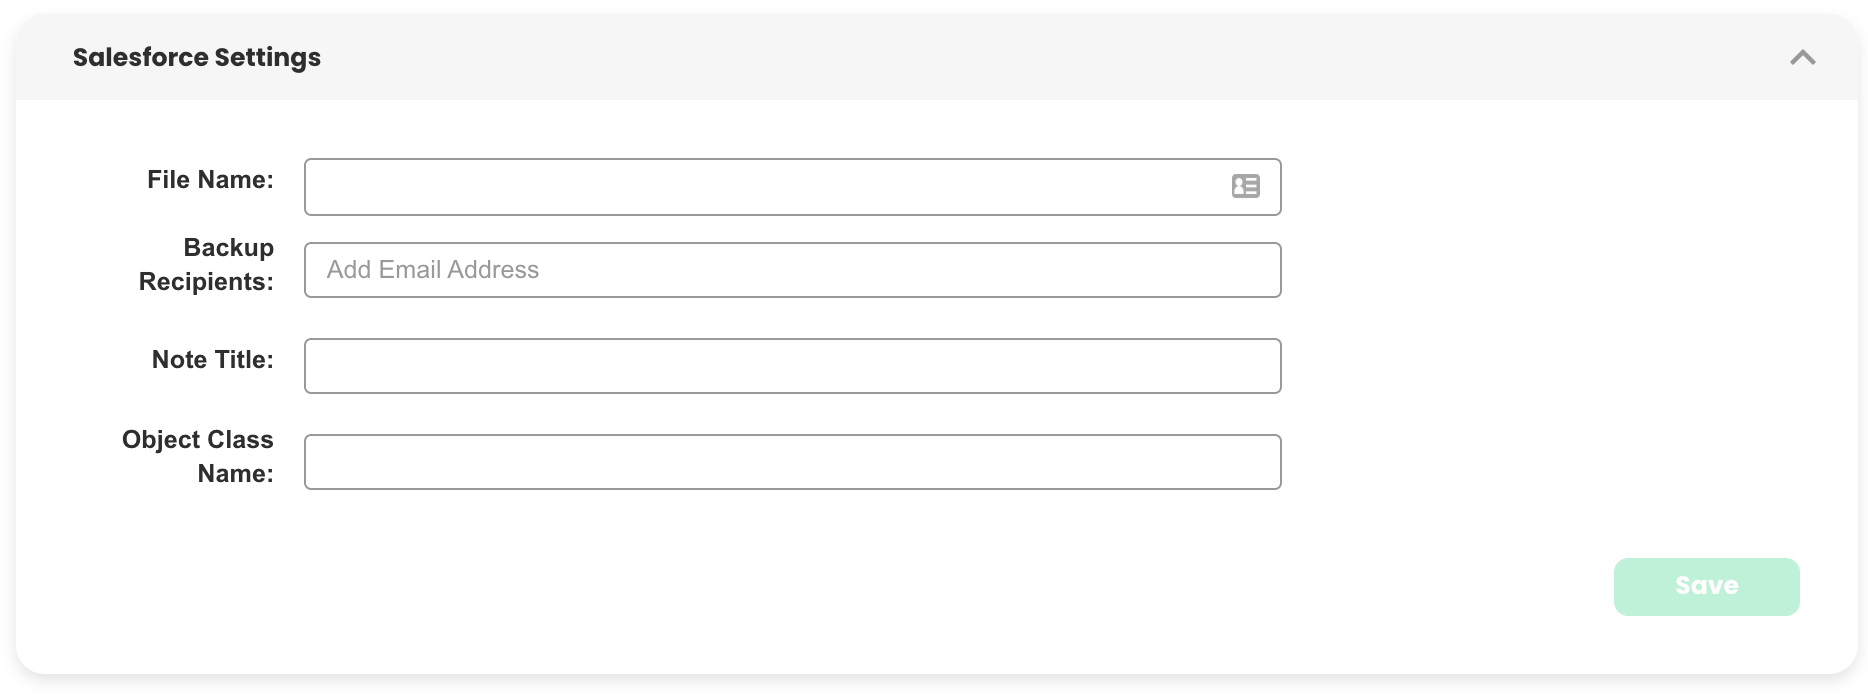
- File Name: The name of the attachment that will get saved to Salesforce. Note: File Name must end with ‘.pdf’
- Backup Recipients: In the event a document fails to upload to Salesforce, the app will send an email to all email addresses listed in Backup Recipients. This email will include the attachment that failed to upload to Salesforce, as well as the customer information and a brief description of why it failed to upload.
- Note Title: The title of the note that will be uploaded to Salesforce under the Notes & Attachments section.
- Object Class Name: The API name of the object that the results will be pushed to. Note: This API name must match the API name of the object that is being fetched from the query in the Appointments section. Typically this will be i360__Appointment__c to result to the appointment object.
- Salesforce Field: The API name of the field (from Salesforce) to push the entered value to.
- SF Data Type: The data type that Salesforce is expecting for the specified field.

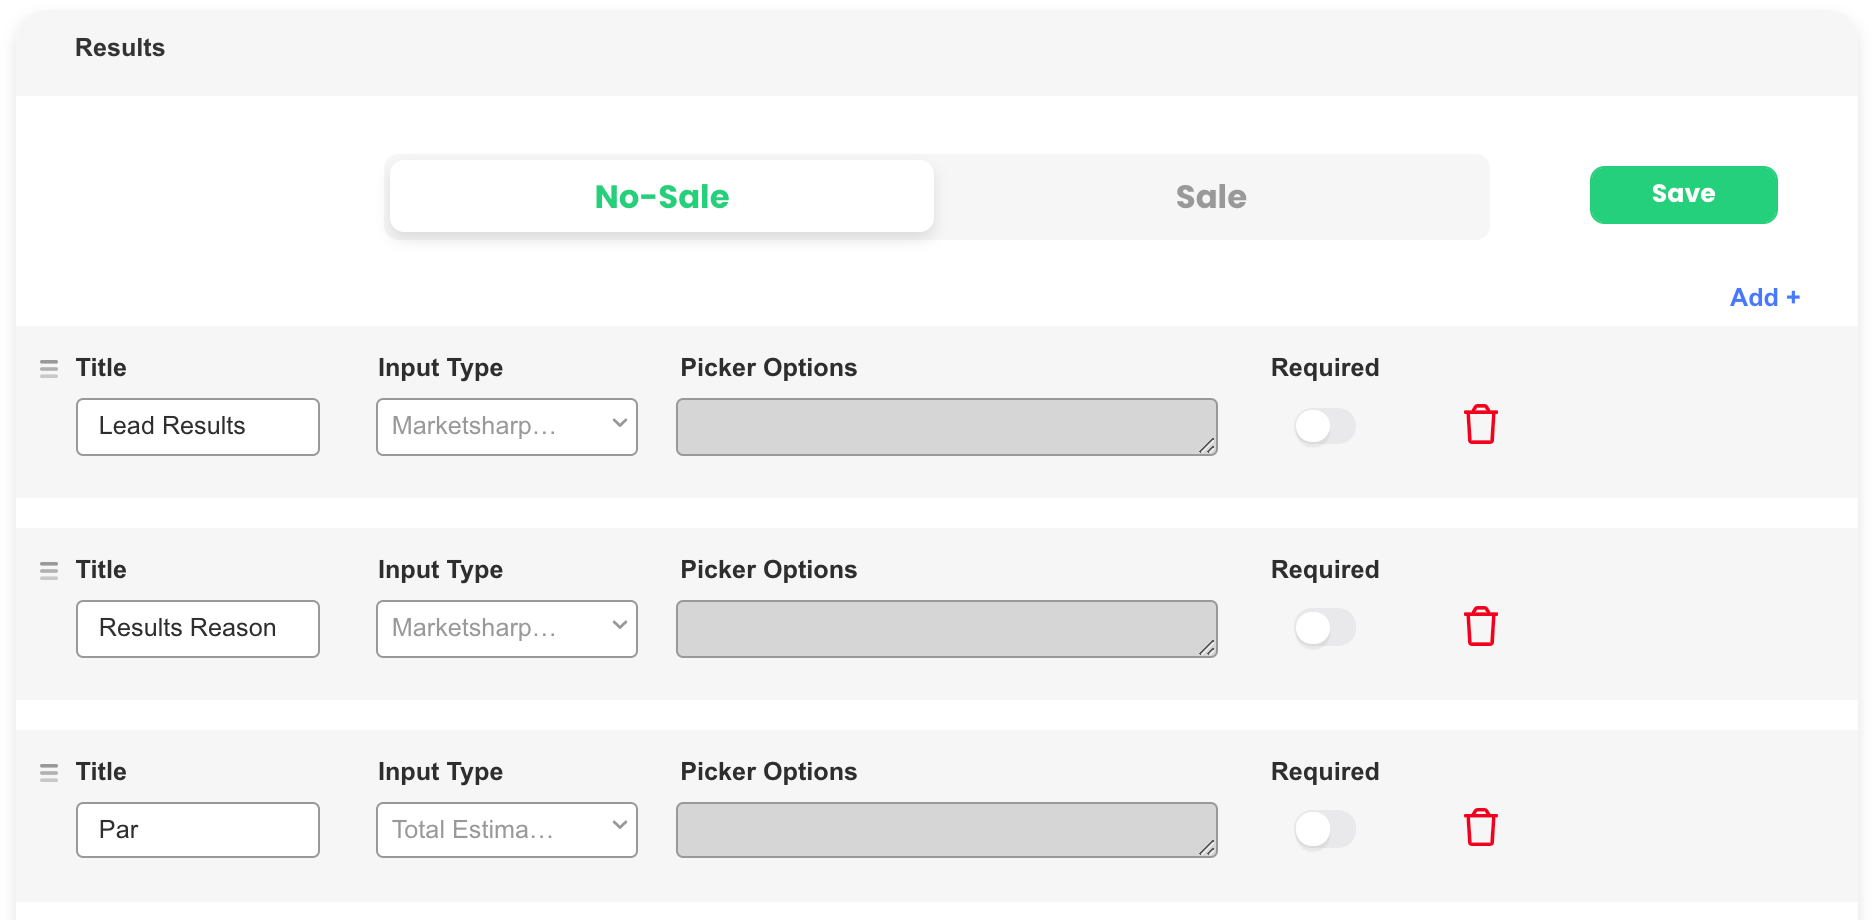
Results Input
Use this section to define fields that users fill out when resulting an estimate. In this section you can define separate fields for No-Sale and Sale.
- First click the form you want to add it to: No-Sale or Sale.
- To add a new field, click Add.
- Fill in all the necessary fields. See below for detailed information on Input Types.
Input Types
- Standard Keyboard (Sentence: )Use when a user needs to type a sentence.
- Standard Keyboard (Paragraph): Use when a user needs to type a paragraph
- Standard Picker: Use when you want to define multiple-choice options for the user to pick from.
- Finance Options Picker: Display a list of finance options loaded from the app.
- Available Contacts Picker: Display a list of the contacts in the Available Contacts
- See Permissions section for details on how to add to this list.
- Currency Input: Use when the user should type in a dollar amount.
- Total Sale Amount: Use to have the user input the total sale amount of a sold lead.
- Total Estimate Price: Use when you want the total price of the estimate to be carried over to the result. This input cannot be edited by the user. You can define a formula for this field in the Price Formulas.
- Commission Estimate: Use when you want a commission estimate to be calculated based on the Total Sale Amount and the measurements entered into the app by the user. This input cannot be edited by the user. You can define formulas to calculate commissions in the Commission Formulas.
- Customer’s Email: Use when you want the customer email address(es) that were entered in the estimator to appear in the results. This input cannot be edited by the user.
- Number Pad (1): Use when you want the user to type in a whole number.
- Number Pad (1.00): Use when you want the user to type in a number with decimal places.
- Phone Number: Use when you want the user to enter a phone number.
- Currency ($1): Use when you want the user to enter a currency value to the whole dollar.
- Email Address: Use when you want the user to enter an email address.
- Number Keyboard: Use when you want the user to be presented with a number keyboard.
- Size Picker (1/4) (1/8) (1/16): Use when you want the user to enter a 2D size (i.e. LxW).
- 3D Size Picker (1/4) (1/8) (1/16): Use when you want the user to enter a 3D size (i.e. LxWxH).
- Date Picker: Use when you want the user to enter a date.
- Credit Card Number: Use when you want the user to enter a credit card number.
- MarketSharp Lead Results Picker: Fetches all Lead Results from MarketSharp and lists them in a picker. If MarketSharp is selected in the API dropdown (see Results Settings section) this will also result the appointment inside of MarketSharp.
- MarketSharp Result Reasons Picker: Fetches all Result Reasons from MarketSharp and lists them in a picker. If MarketSharp is selected in the API dropdown (see Results Settings section) this will also result the appointment inside of MarketSharp.
- LeadPerfection Dispositions: Fetches all Disposition from LeadPerfection and lists them in a picker. If you have LeadPerfection selected in the API dropdown (see Results Settings section) this will also change the Disposition of the lead inside of LeadPerfection.
- LeadPerfection Product 1-5: Fetches all Products from LeadPerfection and lists them in a picker. If you have LeadPerfection selected in the API dropdown (see Results Settings section) this will also change the Disposition of the lead inside of LeadPerfection.
- JobNimbus Customer Workflow Picker: Fetches all Customer Workflows from JobNimbus and lists them in a picker. If you have JobNimbus selected in the API dropdown (see Result Settings section) this will also change the Customer Workflow inside of JobNimbus.
- Picker Options: When you select Standard Picker as your Input Type, list the values you want to appear in this picker, separated by commas (see example in image above)
- Required: Turn on the required switch when users must enter a value into a field before they can save/update their lead result.
- Action: Clicking the Delete icon in the action column will delete that row from the results table.
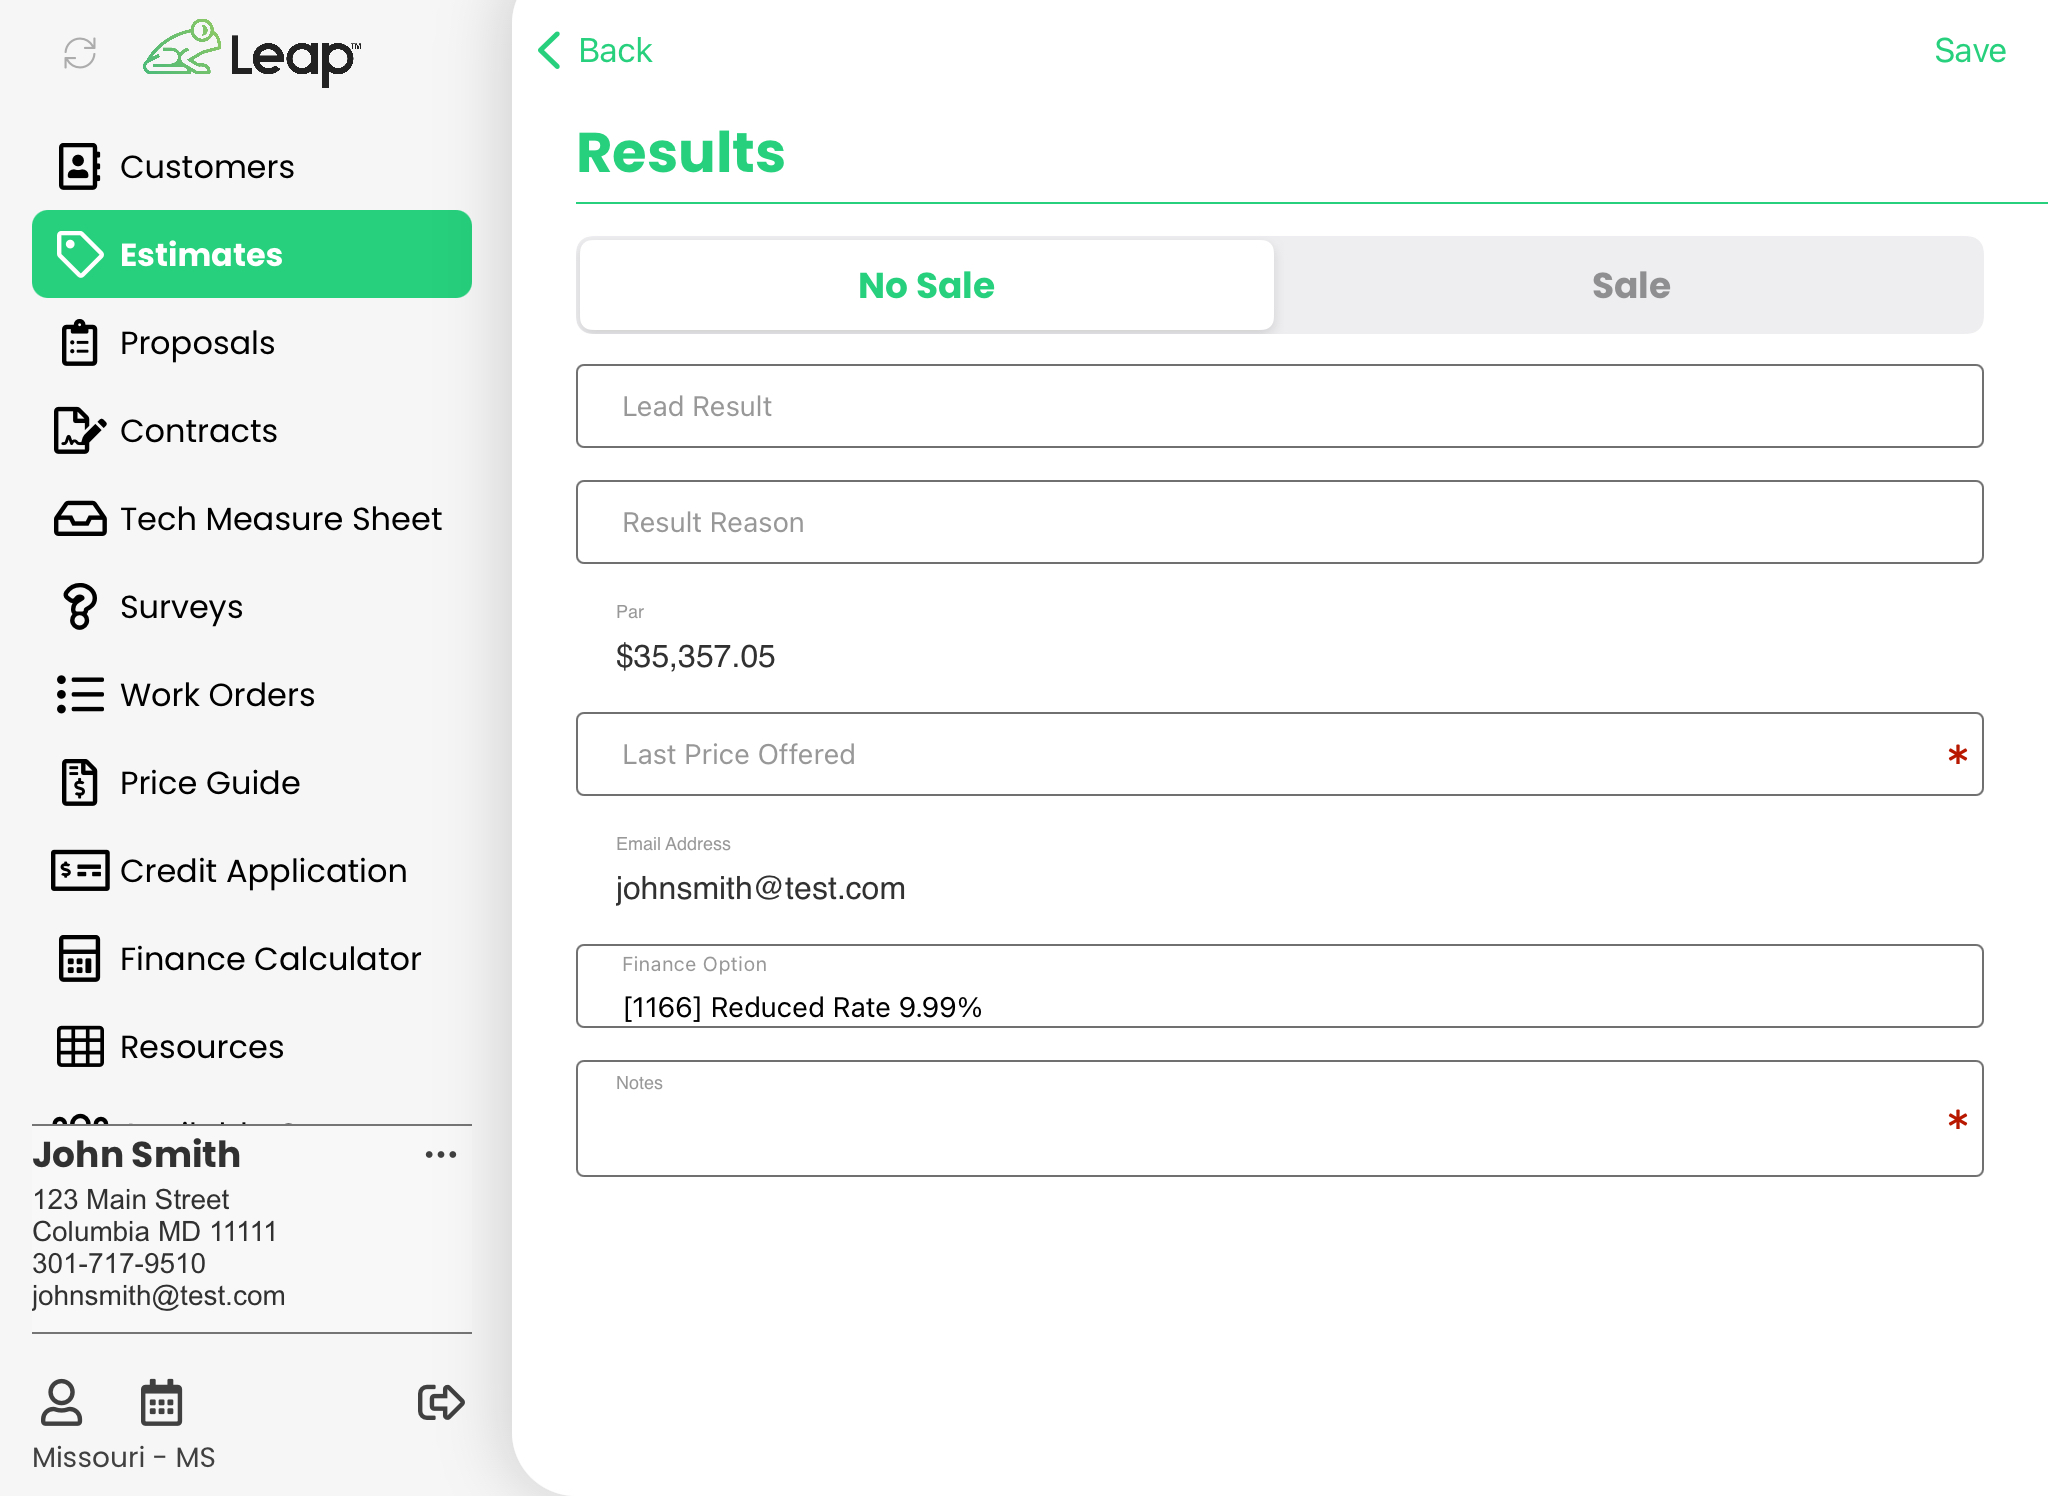
Resulting an Appointment
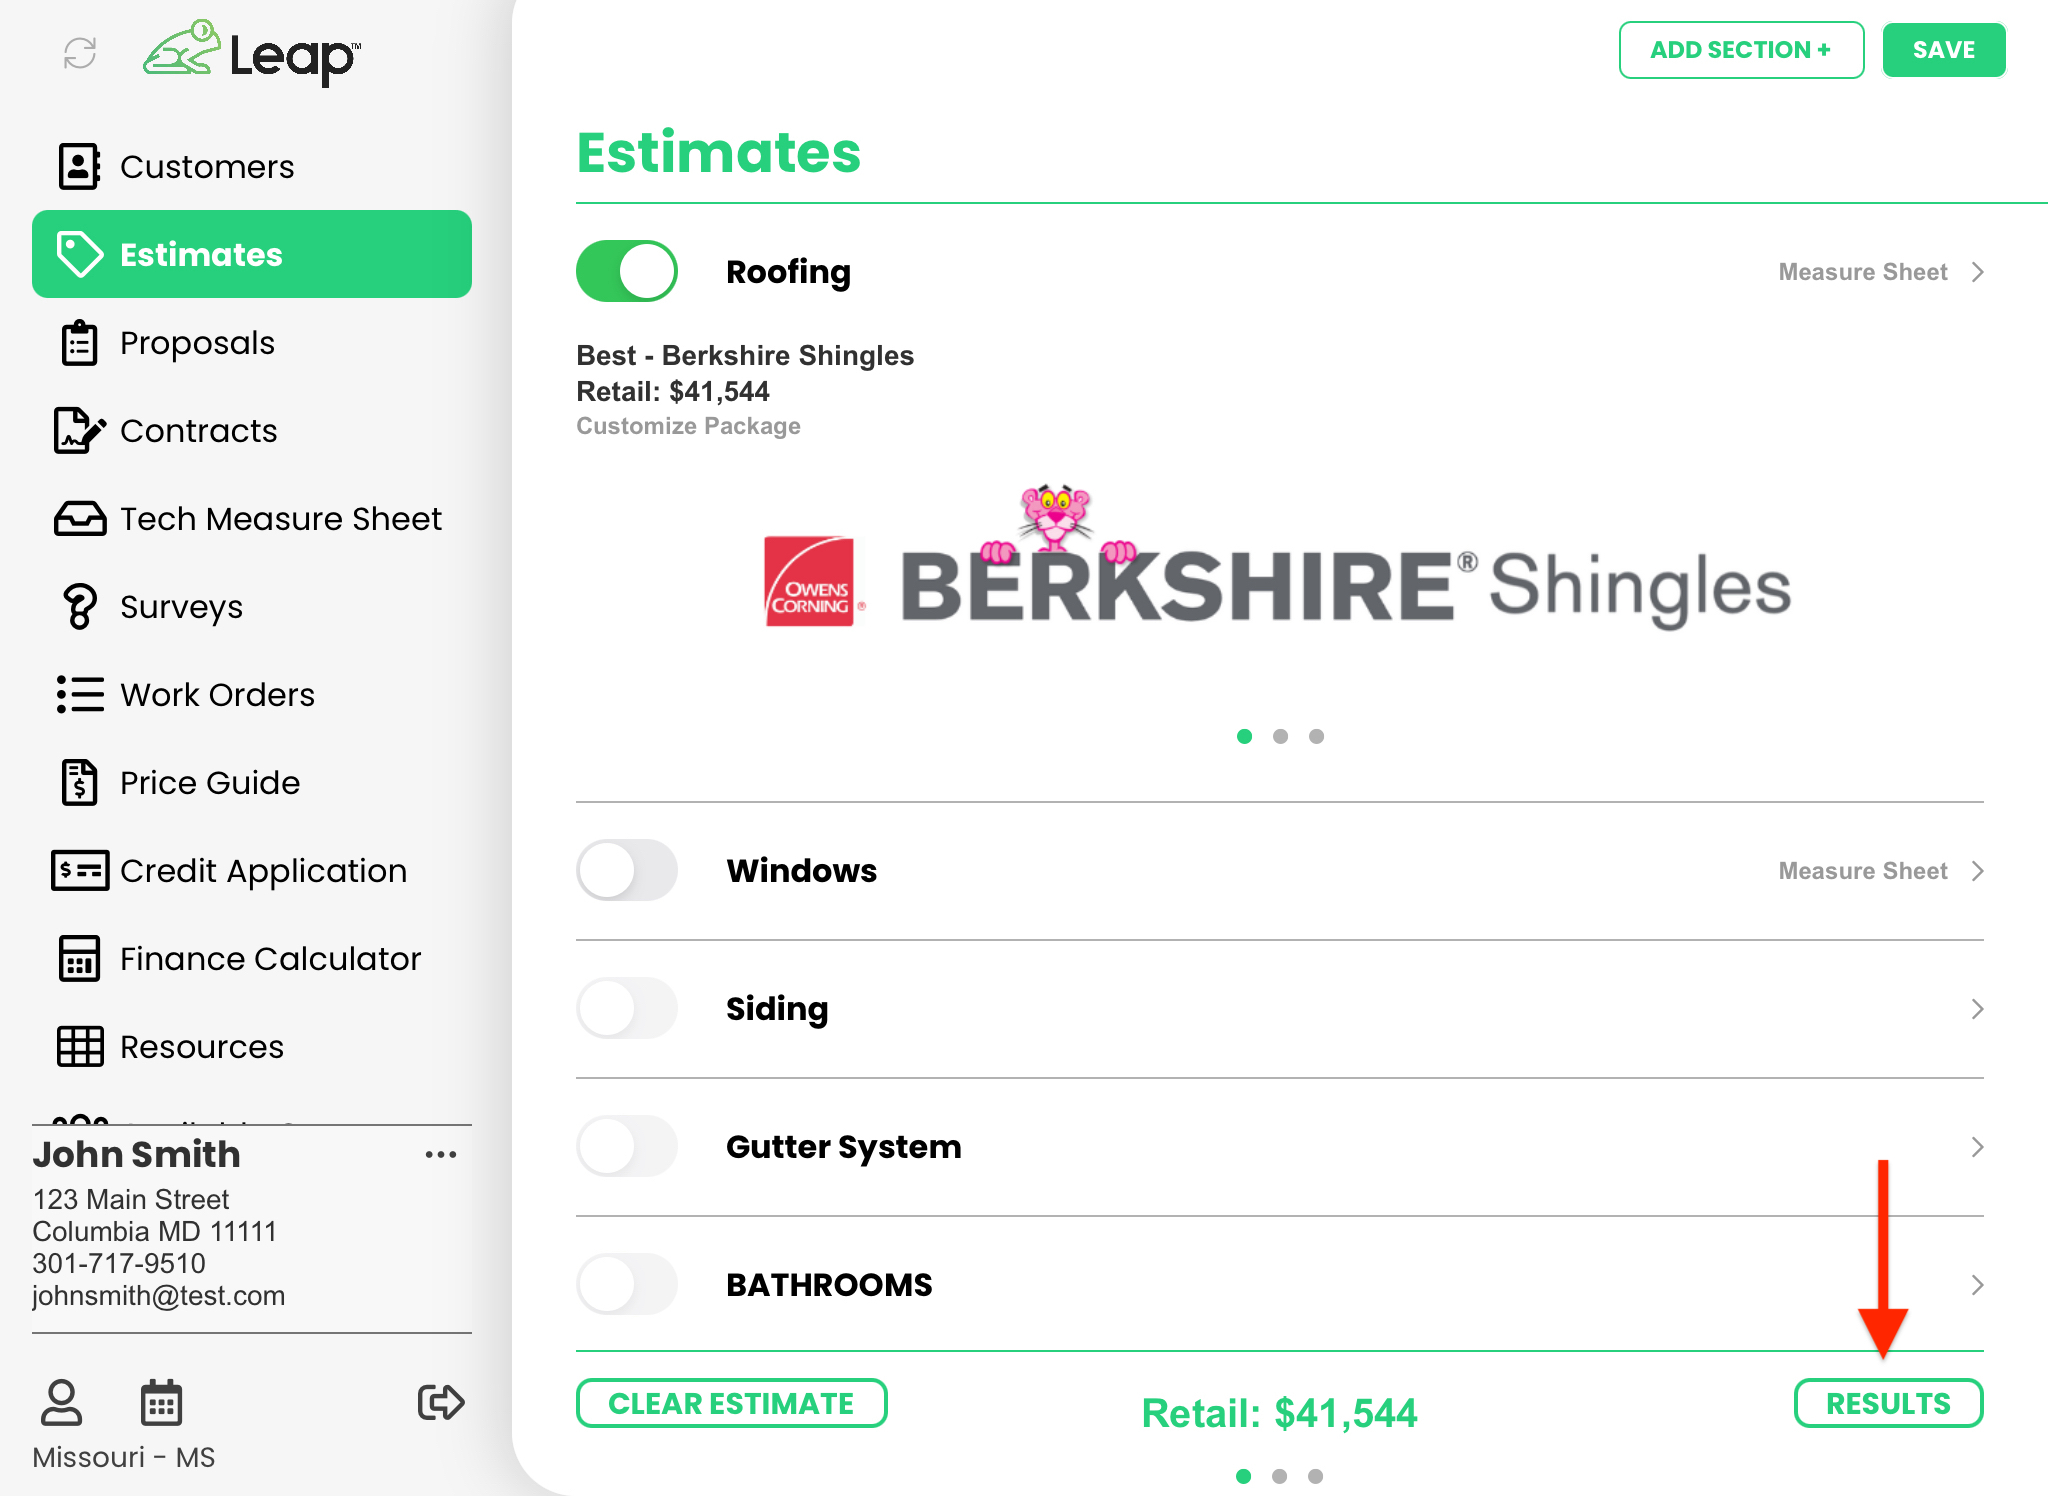
- In the Estimates section of the App, tap the Results button on the bottom right corner of the screen.
- Determine if the appointment will be resulted as a No Sale or Sale.
- Fill in all the necessary fields.
- Click Save to finish resulting the appointment.